#DIY electronics
Explore tagged Tumblr posts
Visit Tumblr Blog
Explore Tumblr blogs with no restrictions, modern design and the best experience.
Last Seen Tumblr Blogs


Fun Fact
Users from the US are the majority of Tumblr visitors.
Text

This photo is weirdly intimate, so i wanted to share
98 notes
·
View notes
Text
youtube
I mentioned noise box 3 recently. here it is, in all it brutalist glory
Warning, Sudden lights and sounds. Harsh sounds. Noise box 3 is a aggressive noise maker with objectively too much gain/distortion.
12 notes
·
View notes
Text
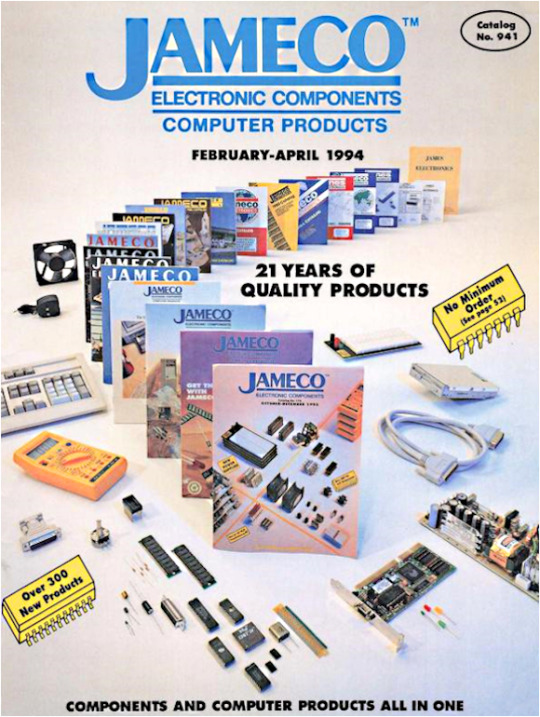
Jameco Electronic Components
Catalog 941, February - April 1994
Jameco Electronics has been serving hobbyists, engineers, and industry professionals for over 45 years. I personally can count myself among those who would thumb endlessly through the pages, from my pre-teen years into my engineering career.
Founded in 1972 by Dennis Farley, Jameco began as a small mail-order business in Silicon Valley, California. Initially focusing on surplus electronics, the company expanded its product line to include a wide range of electronic components, tools, and accessories.
Throughout its history, Jameco has been committed to providing exceptional customer service, competitive pricing, and a vast selection of products. Today, Jameco remains a trusted source for electronic components, continuing to support innovation and creativity in the electronics community.
#90s magazines#90s electronics#jameco electronics#catalog covers#1994#1990s#90s#nineties#mid 1990s#vintage catalogs#retro catalogs#retro tech#vintage tech#jameco#tech catalogs#diy#diy electronics#electronic hobbyists#low quality image
7 notes
·
View notes
Text
need a bit of advice on something rather new to me... i have been DYING to get into some semblance of diy electronics/robotics, specifically regarding the idea of building a flipper zero knockoff with a raspberry pi/esp32/arduino. or a hack rf one ripoff, etc. u get it? i wanna make a lil handheld pwnagotchi pet style device for rolljam rf shit, something that can copy and paste and send and receive rf signals, but homemade by my self....
please if anyone has experience, resources, ideas, anything at all= hit me up right now immediately asap today please.... i am so passionate and ready to do this please help me make device go beepboop
#flipper zero#hack rf one#raspberry pi#esp32#arduino#diy electronics#diy#diy hacking#car hacking#hacking hardware#hacking#help#hacking help#hacking question#need advice#diy projects#diy craft#diy punk#upcycle#homebrew
14 notes
·
View notes
Text

all the signal wirin is done now i gotta start runnin power lines & test
7 notes
·
View notes
Text
Affinity DesignerでTayda向けのフルカラーUV印刷原稿を作成する
続・エフェクター用のアルミダイキャストケースを発注した話です。今回はフルカラーの印刷を発注してみました。

タイに拠点を持つ電子部品のネット通販サイト「Tayda Electronics」では、ペダル型エフェクターでよく使われているアルミダイキャストケースの塗装や穴あけ加工、UV印刷といったサービスも提供しています。1個単位で発注でき、価格もかなりリーズナブルなので、世界中に利用者がいるようです。
自分も以前P-EQのケースを発注しているのですが(下記がそのときの記事)、そのときは青の本体に白で文字やマークを印刷する、というシンプルなものでした。ただ、単色ではどうしてもシンプルなデザインしか作れないので、今回はフルカラーでのUV印刷を発注してみることにしました。
今回のゴール:Illustoratorを使わずに発注する
TaydaのUV印刷は、印刷するデータをオンラインで(Web上で)アップロードして発注する仕組みになっています。入稿データはPDF形式が指定されているのですが、TaydaではAdobe Illsutorator以外で入稿データを作成することは推奨していないらしく、入稿データ作成用の説明などもすべてIllustratorを前提としています。ただ、Illustratorは利用料金が通常価格で1年あたり約3万4,000円と、個人が趣味で利用するにはハードルが高いお値段です。ということで、今回は同じような印刷用データの作成機能を持つAffinity Designerというソフトウェアを使って入稿データを作成します。
Affinity DesignerはIllustratorを使ったことがあれば比較的すぐに習得できるかと思います。もちろん細かい点で違いはありますが、ドキュメントも充実しているため、不明点などがあったら検索すれば大体の問題はすぐ解決できるかと思います。
ちなみにAffinity DesignerはMac/Windowsで動作し、価格(2025年6月時点)は6,590円ですが、年1、2回の頻度でセールをやっており、そのタイミングだとかなりお安く購入が可能です。もし急ぎで必要でないのであれば、セール時の購入をおすすめします。
なお、先に述べたとおり基本TaydaではIllustratorの利用を推奨しているため、下記で説明している手順は単なる「こうやったらできた」というレポートです。当方では成功を保証できませんのでご了承ください。
テンプレートとサンプルファイルのダウンロード
TaydaのUV印刷サービスページではアルミダイキャストケースのUV印刷用のテンプレートが公開されているので、こちらをベースにデータ作成を始めます。
今回は1590Bサイズ(MXRのエフェクターとほぼ同サイズ)のケースに印刷してもらうので、「1590B type enclosure AI format template CLICK HERE (artboard size 56 x 108.50mm)」をダウンロードします。ちなみにAffinity DesignerはAI形式のファイルをそのままインポート可能です。また、同じページ内の「Here is example UV printing file we made for 125B enclosure size with Adobe Illustrator,」という部分の下、「EXAMPLE FILE AI FORMAT CLICK HERE」というリンクからサンプルファイルをダウンロードできるので、こちらもダウンロードしておきます。
テンプレートファイルを開いて編集する
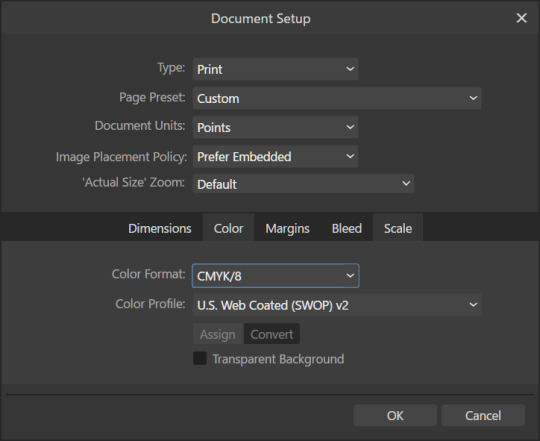
ダウンロードしたテンプレートファイルをAffinity Designerで開きます。この際、「PDF Options」という画面が表示されますが、デフォルト設定のまま「OK」を選択します。

また、ファイルを開いた直後はカラーモードがRGBになっているので、「Document Setup」の「Color」タブで「Color Format」を「CMYK/8」に変更しておきます。
「COLOR」レイヤーにフルカラー印刷したい文字や図形を配置する
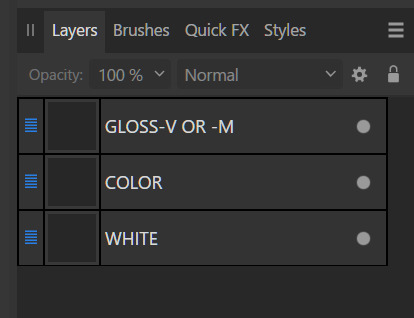
このテンプレートファイルには「GLOSS-V OR -M」「COLOR」「WHITE」という3つのレイヤーが用意されていますが、まずは「COLOR」レイヤーに印刷したい文字や図形を配置していきます。
このレイヤーに配置した文字や図形(オブジェクト)は、フルカラーで印刷されます。なお、ラスター画像(写真などの画像)は推奨しないとのことで、Affinity Designer上で図形ツールや各種ペン・ブラシツールを使ってデザインを作成していくことになります。
「WHITE」レイヤーに白で印刷したい文字や図形を配置する
「COLOR」レイヤーはフルカラー(CMYK)での印刷が可能ですが、白の印刷はできません。そのため、白い文字や図形は「WHITE」レイヤーに配置する必要があります。さらに、「COLOR」レイヤーの印刷は下地が白であることを想定しているため、(特に意図しない限りは)「COLOR」レイヤーに配置したオブジェクトの下が白く塗りつぶされるよう、「WHITE」レイヤーにも同じオブジェクトを配置することが推奨されています(イメージとしては、UVプリンタメーカーによる解説「透明な印刷対象物に印刷する (下地にホワイトインクを印刷)」や「印刷対象物の色に影響を受けずに印刷する(下地に白印刷)」が分かりやすいです)。
具体的な作業としては、「COLOR」レイヤーにオブジェクトを配置したら、それをそのままコピー&ペーストして「WHITE」レイヤーに配置して、同じオブジェクトが白でも印刷されるようにしておけばOKです。印刷時には最初に「WHITE」レイヤーが印刷され、続けて「COLOR」レイヤーが印刷されるため、このように設定することで白いインクで印刷された文字や図形の上にカラーで文字や図形が印刷されるようになります。
なお、「WHITE」レイヤーにオブジェクトを配置する際の注意点として、このレイヤー内に配置するオブジェクトの色はすべて「RDG_WHITE」というspot color(特色)を指定する必要があります。spot colorを指定する方法はいくつかあるのですが、サンプルファイルのスタイルをコピペするのが簡単で確実です。
まず、ダウンロードしておいたサンプルファイルをAffinity Designerで開きます。「WHITE」レイヤー内に「Curve」(Yの文字)があるので、これを右クリックしてコピーします(同じ「Y」の文字が「GLOSS-V」レイヤーにもあるのでそちらをコピーしないように注意)。
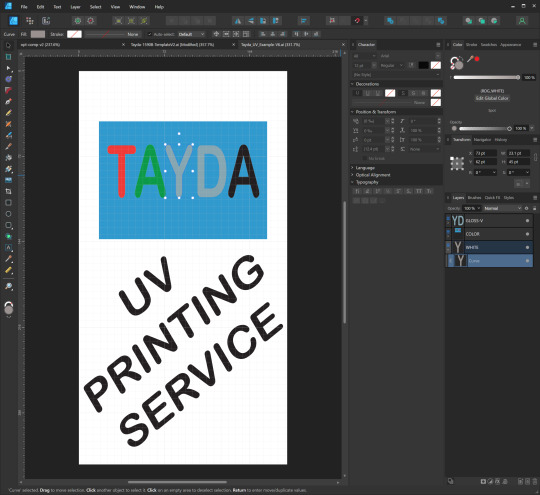
続いて、「RDG_WHITE」を設定したいオブジェクトを選択し、「Edit」メニュー内の「Paste Style」を実行します。
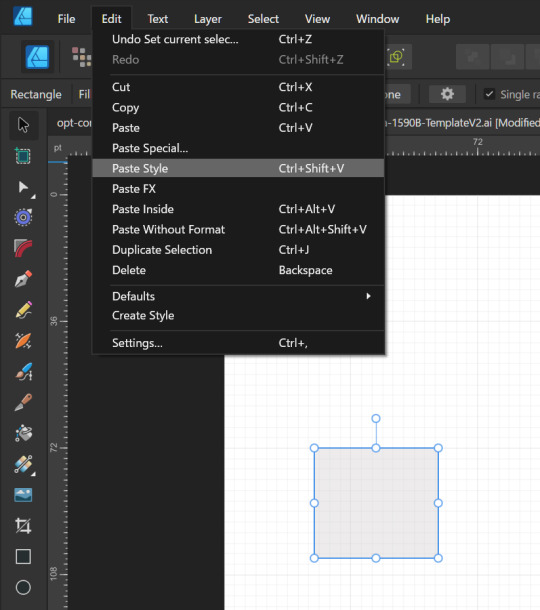
すると、そのオブジェクトの塗りつぶしカラーが「RDG_WHITE」に設定されます。

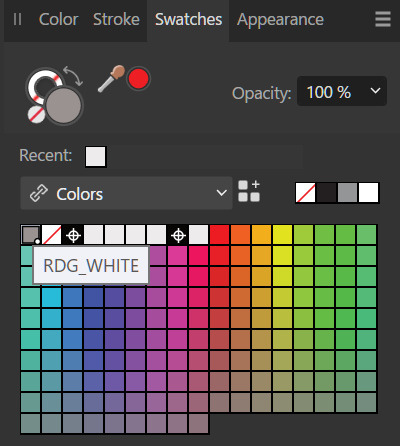
また、塗りつぶし色として「RDG_WHITE」が設定されたオブジェクトを選択した状態で「Swatchs」タブの「Colors」横にある「■+■■」ボタンをクリックするとSwatches内に「RDG_WHITE」が追加され、ここから「RDG_WHITE」を指定できるようになります。
「GLOSS-V OR -M」レイヤーについて
「GLOSS-V OR -M」はTaydaの有料オプションで用意されているグロス(光沢)/マット(艶消し)仕上げサービス用のレイヤーで、ここにオブジェクトを配置するとその位置に光沢/艶消しインクを乗せてくれるとのことですが、自分は使ったことがないので割愛します。なお、このレイヤーに配置するオブジェクトはすべて色としては「RDG_GLOSS」を指定しておく必要があります(参考:「表面を仕上げる(グロス印刷)」)
そのほかのレイヤーについて
Affinity Designerでは、出力用データの作成時(エクスポート時)に選択したレイヤーだけを出力する機能があるので、印刷しないガイド用の図形などは別レイヤーに分けて置きましょう。たとえば自分の場合、穴開けする場所に穴(円)を描いたレイヤーを用意したりしています。
出力するレイヤーの指定
デザインデータの作成が完了したら、PDFへの出力を行います。実はここが一番ハードルが高く面倒くさいところだったりします。
まず、ウィンドウ左上の「Export Persona」をクリックします。この状態では、エクスポートするレイヤーなどの設定を行うことができるので、「Layers」タブで出力したいレイヤー(「GLOSS-V OR -M」、「COLOR」、「WHITE」の3つ)をクリックしてエクスポート対象に指定します(ウィンドウから矢印が飛び出たアイコンがハイライトされた状態にする)。

この設定が終わったら、「Design Persona」をクリックするとデザイン画面に戻れます。

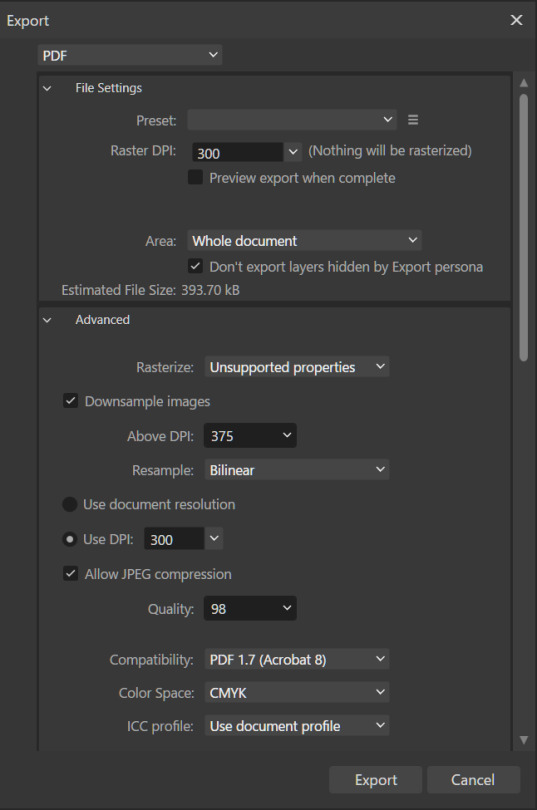
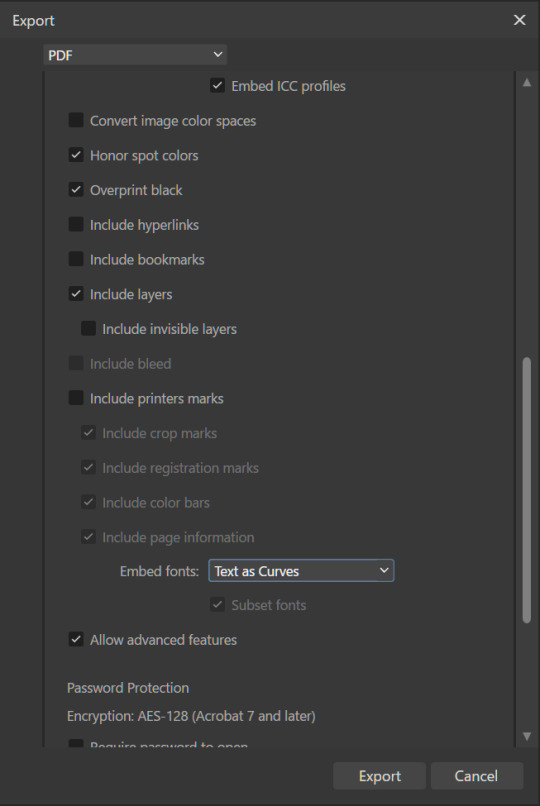
エクスポート設定
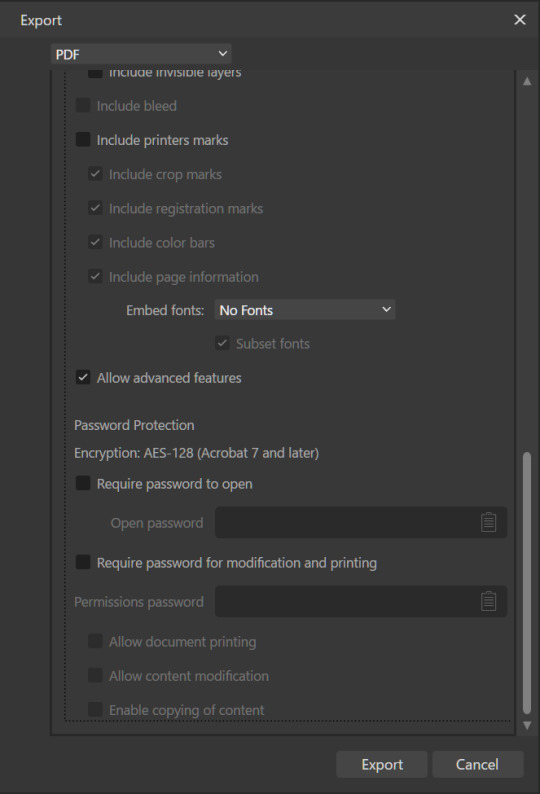
続いて「File」-「Export」メニューを選択し、エクスポート画面を開きます。ここではフォーマットとして「PDF」を選択し、続いてオプションを次の画像のように選択します。
(注:「Raster DPI」の部分に「Nothing will be rasterized」と表示されているかも確認してください。Affinity DesignerはPDFで表現できない機能を使ったオブジェクトを自動的にラスター画像化する機能があり、ラスター化された画像が含まれていない場合のみここに「Nothing will be rasterized」が表示されます。)
最後に「Export」ボタンをクリックし、出力するファイル名や保存先を指定します。
Acrobat(無料版)でデータを確認する
最後に、データが正しくエクスポートされているかをAdobe Acrobatで確認します。Acrobatは有料版(Pro)と無料版がありますが、最低限の確認は無料版のみで可能です。
まず、画面左のレイヤーアイコンをタップして、PDF内に含まれるレイヤーを確認します。
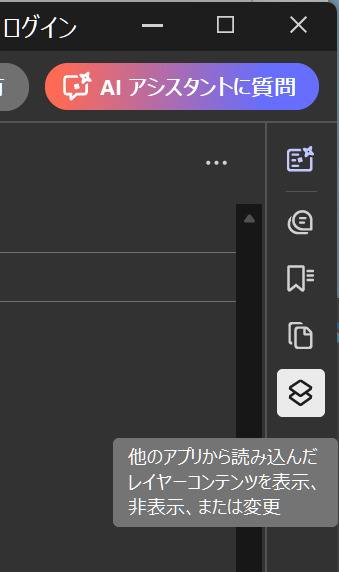
「WHITE」「COLOR」が(もし使用していれば「GLOSS-V OR -M」も)含まれていればOKです。また、レイヤーを右クリックして「レイヤーを表示」を選択することでレイヤーの表示/非表示を切り替えることができます。ここで「WHITE」レイヤーに本来「COLOR」レイヤーに含まれるはずのカラーの文字や図形が入っていないかなどをチェックしておきます。

(ちなみに、自分は事故を避けるために「WHITE」「COLOR」レイヤーの中にはレイヤーを作らないようにしているためこの2つのレイヤーしか表示されませんが、レイヤー内にレイヤーを作っている場合はそれもここに表示されるはずです)。
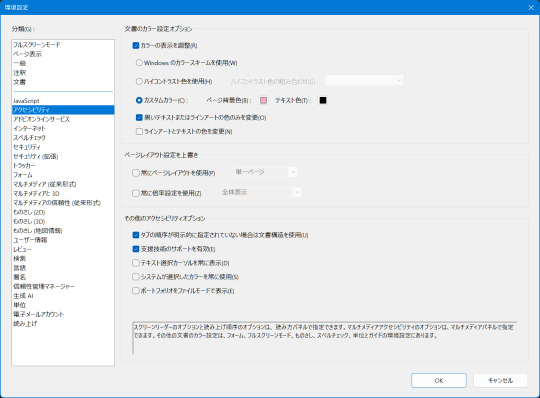
なお、Acrobatの標準設定では背景が白で表示されるのですが、この設定では「WHITE」レイヤーが確認しずらいです。そのため、自分はAcrobatの「メニュー」-「環境設定」で表示できる環境設定画面の「アクセシビリティ」で、「ページ背景色」を別の色に変更しています。この設定だと、「WHITE」レイヤーを非表示にした際にどうなるかが分かりやすくなります。
また、PDFを拡大表示して、輪郭がスムーズになっていない(ギザギザになっている=ラスター画像化されている)部分がないかもチェックします。
最後に、PDFコンテンツ表示エリアを右クリックして「文書のプロパティ」を選択します。すると「文書のプロパティ」画面が表示されるので、下記をチェックします。
「概要」タブの「PDFのバージョン」。Affinity Designerでエクスポート時に選択したもの(1.7)と一致しているか
「概要」タブの「ページサイズ」が適正かを確認。1590Bサイズなら「56.0×108.5mm」。
「セキュリティ」タブの「文章のセキュリティ」および「文書に���する制限の概要」。「セキュリティなし」、「Acrobatの全バージョン」、「印刷」が許可になっているかを確認。
「フォント」タブでフォントが埋め込まれていないかを確認。何も表示されていなければOK。
これで問題が無ければ、あとはTaydaに注文&入稿を行えばOKのはずです。
ちなみに、この筐体は最終的にはこんな��じになっています。このデザインでは、筐体がシルバー塗装なのを利用し、カラー印刷したい図形(「COLOR」レイヤーに配置した図形)の下にあえて白インクを重ねないことでメタリック感を残しつつ文字はくっきりさせています。

2 notes
·
View notes
Text


Prototype time!
My first project in 2025. It was nice trip down memory lane, returning to 8bit micro controller. I am still trying to get the hang of the printing setup and new filament so the printing is pretty poor on this one.
#programming#gluing stuff together#diy electronics#attiny85#MQ9 sensor#avr#3D print#microcontrollers
2 notes
·
View notes
Text
As I mentioned, since the power has been out for over a day, I took the household phones, laptops, and rechargable batteries to the library today to recharge them. This left my wife here without much in the way of entertainment, so before I left, she was asking if we had a portable radio around, preferably one that didn't need headphones.
This is where it comes in really handy that her stepdad sent me two electronics kits for Christmas: an AM radio, and an FM radio. (And that I built them both nearly as soon as I got them; I don't have a battery- or butane-powered soldering iron, so having them in pieces would be pretty useless.) So we set up the FM one and it's been playing music all day.
As much as we sometimes question the utility of broadcast media in a world where people keep saying "everybody has a smartphone", it's really nice to have these fallbacks, because there will always be emergencies and outages.
17 notes
·
View notes
Text
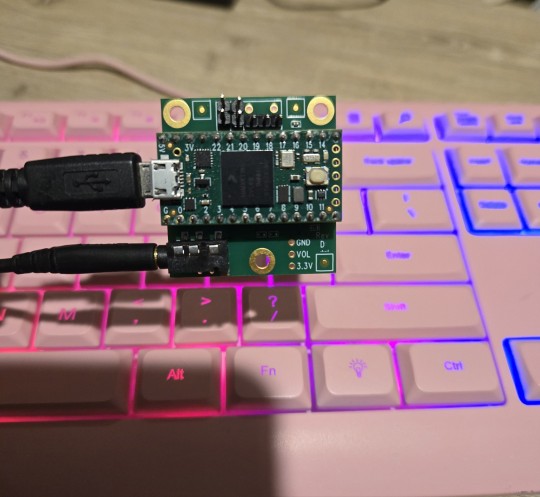
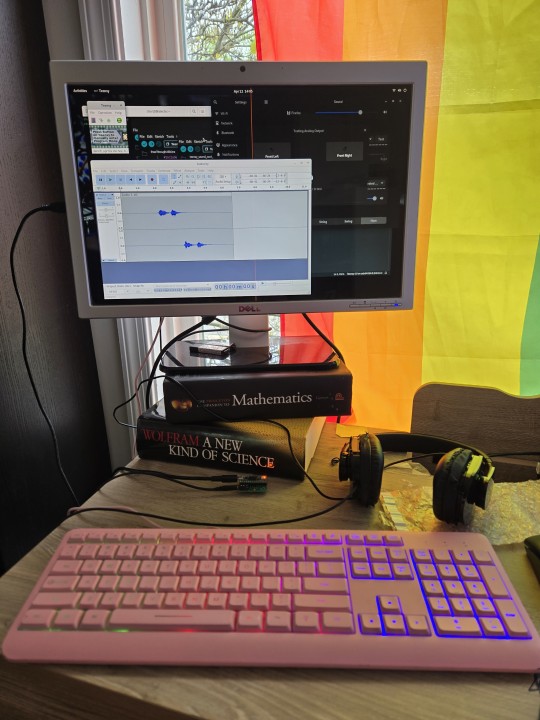
Success! I got the teesy set up as a recording device in audacity. Right now it's just doing usb audio through (with reverb, because why not). But the plan is to get line in connected to a jack to be able to listen to the Machine
42 notes
·
View notes
Text
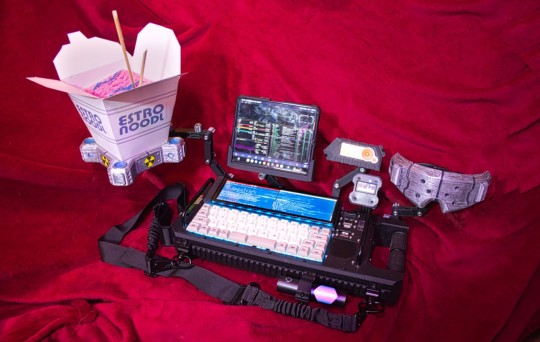
this is peak technology design, this is the eroticism of the machine, this is what using the computer should look like.
Source: https://hackaday.io/project/191858-cybersecdeck-001/details
7 notes
·
View notes
Text
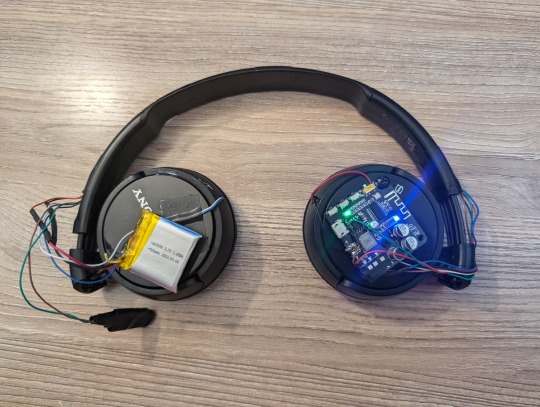


I finished this a few weeks ago but I forgot to post anywhere so what better for my first tumblr post.
Made from a pair of wired Sony headphones, a battery pulled from a broken pair of Bluetooth headphones and a Bluetooth audio board from AliExpress
4 notes
·
View notes
Video
youtube
Controlling Plastic Injection Machine Nozzle Movement with a Digital Las...
#youtube#Plastic Injection Machine#Nozzle Movement#Digital Laser Ruler#Arduino Project#Wemos D1 Mini#Stepper Motor#3D Printing#Industrial Automation#DIY Electronics#Tutorial#Arduino#Digital Control#Laser Ruler#DIY#VL53L0X#ULN2003#Maker Community
6 notes
·
View notes
Text

I gave birth to an angel
9 notes
·
View notes
Text
Old Bamp
8 notes
·
View notes
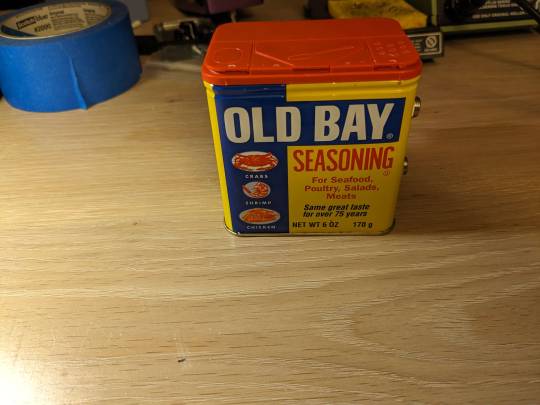
Text

fucked up that I can't eat these
3 notes
·
View notes
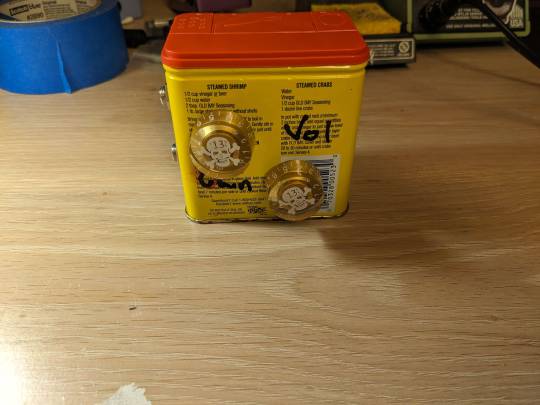
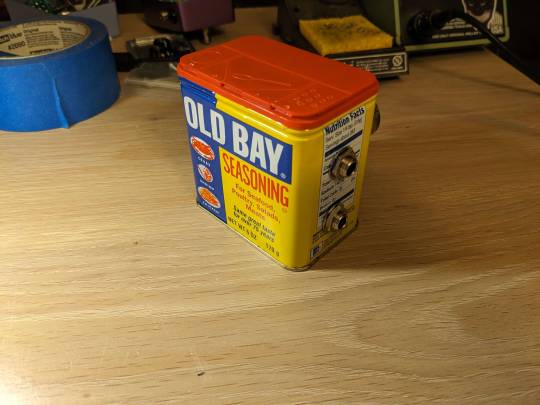
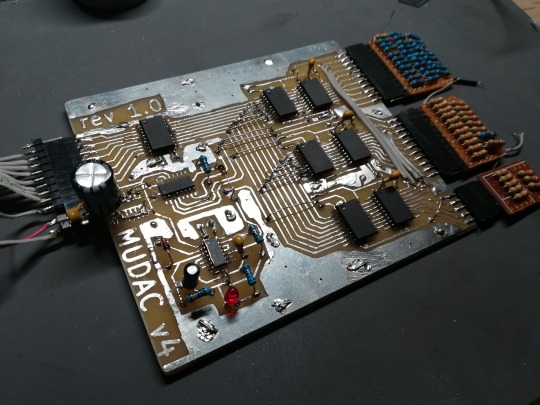
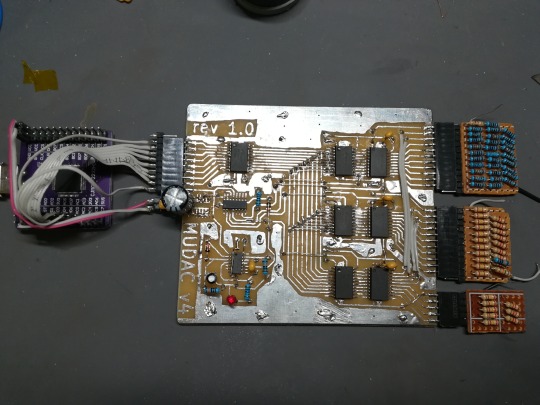
Text
DIY FT232 3 Channel R2R DAC
In previous post i mentioned some updates in hardware.
Here i show schematic and explain how it works:
2 notes
·
View notes